How do you rate this blog

Sunday, July 3, 2016

Dynamic Security in SSAS in Detail

We all have applications which have security implemented at the application access level and at data level. Now if we have cube over this for reporting we would like the data level security to propagate to this layer and subsequently into the cube.
So how do we propagate this?

Lets do this by considering a simple example of a sales data model as shown in the image below.


Given below are the dimensions-
1) Product - Stores all the products


2) Date - Stores all the dates valid in this case I am using only months


3) Employee - Stores the list of all users who can access the application.


Fact table -
1) Sales - Stores all the sales data.


Bridge Table -
1) Employee to Product Mapping - Stores the list of product an employee can see.


For employee in the login make sure you add the proper username which should be in <domain name>\<username> format. If you do not know open command prompt and enter the command whoami to find it out.

Now lets build the cube over this. All the tables mentioned above should be present in the data source view as shown in the image below.


Lets build the cube with 2 measure group.

1) Fact Sales - Contains the sales data
2) Emp Prod Bridge - Contains the count of mapping between users and products which will be used in the dynamic security.

You need to have the below dimensions -
1) Product
2) Employee
3) Date

Once it is done, click on the cube and then click on the dimension usage tab. The usage should be as shown in the image below. If it is not there add the dimension and make sure the connection between dimension and fact is present.

Once this is done process the cube. Then open the cube in SSMS and execute the below MDX

SELECT {} on 0,
NonEmpty (
[MST PROD].[PK PROD ID].[PK PROD ID].Members,
(
[MST EMP].[ATTR LOGIN].&[<username which you login>],
[Measures].[EMP PROD BRIDGE Count]
)
) on 1
from [Dynamic Security]

You can see only the products which you have mapped to user who has logged in is being displayed.

Now this is through MDX but how do we enforce this on the cube? For this follow the below Steps -

1) Make sure the users who access do not have administrator rights over the SSAS else this wont be effective since it will take the higher level privilege.
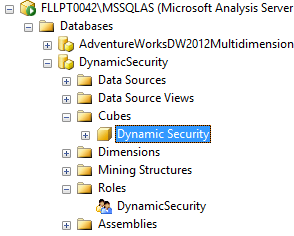
2) Click on Roles as shown in the image below
 

3) Right Click on roles to add a new Role. Give the role some name and allow only Read Permission.
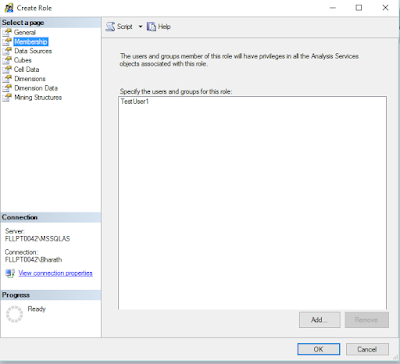
4) Go to the Membership and add the users or usergroup to this place. The best practise is to use usergroup since the permission to this cube can be handled while creating the user in the AD by admins. This will prevent frequent visits to the SSAS to provide access.

5) Go to Datasources and provide read permission.
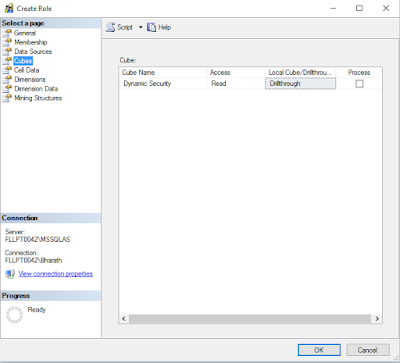
6) Go to Cubes and provide Read and if needed drillthrough feature.


7) Now go to dimension data, you can see the list of all the dimensions present in the cube.

 
Click on Product dimension, go to the Advanced tab and add the code below
NonEmpty (
[MST PROD].[PK PROD ID].[PK PROD ID].Members,
(
StrToMember ("[MST EMP].[ATTR LOGIN].&[" + UserName () + "]"),
[Measures].[EMP PROD BRIDGE Count]
)
)

StrToMember ("[MST EMP].[ATTR LOGIN].&[" + UserName () + "]") is the code which will filter out the dimension data for the user who is accessing the cube.
If you want to allow the user to access over application or powerbi \ excel pivot \ power pivot use UserName(). If you are using sharepoint over this cube you need to use CustomData().

The permission will look like the image below -


Once you are done with the above step click on ok.

Now you are ready with the permission model. You can check this by clicking on the cube and then on the browse button. Once this is done you will see the user icon as shown in the image below.


Click on the user icon and then click on the user. Provide the username and click ok.


You can then browse the cube where in you can see only those records to which the user has access to.

The cube created above with the permission model can be used via Power BI or Power Pivot or Excel Pivot by the end users for Ad Hoc reporting as well.

Tuesday, September 9, 2014

Deploying SSAS on IIS

This post is about deploying SSAS cube on IIS


Deploying cube in IIS

Step 1 - Go to the root folder and create a folder <foldername>. In this I have created a folder called SSAS. Go to <SQL Server Installation path>\<SSAS Folder>\OLAP\bin\isapi and copy the content to the folder which you have created in the root folder.

Step 2 - Open inetmgr and create an application pool on .NET Framework V2.0 and Managed pipeline mode of classic as shown in the image below.


Step 3 - Once this is done, create a new web site with the physical path pointing to the folder which you have created in step 1.

                                                                              
Step 4 - Click on website name and then under IIS double click on Authentication.


Step 5 - Once it is done right click on Anonymous authentication and click on disable and then enable windows authentication in the same way.


Step 6 - Double click on Handler Mappings and on the actions click on Script map same as in step 4.

Step 7 - For Request Path enter *.dll, Executable - point it to the msmdpump.dll in the folder of the report and name it.       


Step 8 - Go to the website folder and you can see a web config file. You need to add the server name <ServerName> as shown below
<ConfigurationSettings>
    <ServerName>fluturavm\fluturahd</ServerName>
    <SessionTimeout>3600</SessionTimeout>
    <ConnectionPoolSize>100</ConnectionPoolSize>
</ConfigurationSettings>
           

Step 8 - Open SQL Server Management Studio and connect to Analysis Service. Once it is done for the server name type the url of the website http://localhost:9999/msmdpump.dll and click on connect.

Sunday, June 9, 2013

Business Intelligence Site in Sharepoint 2010

Now that we have SharePoint platform up and running in our system, lets go ahead and create a Business Intelligence site. There are various types of sites which you can create from the site collections available in the sharePoint portal, the details of the same is given here (http://technet.microsoft.com/en-us/library/cc262410%28v=office.14%29.aspx).

So what is a Business Intelligence Site?
        A Business Intelligence site is used for storing reports and its data connections which will then be consumed in web parts and displayed on the portal. It also has a special feature called performance point services using which you can create interesting reports which is different from your conventional SSRS reports which I will take up in the next post.

    Features of Business Intelligence Sites are
    1) Excel Services
    2) Power Pivot
    3) Reporting Services
    4) Performance Point Services

So how do I set up a Business Intelligence Site in SharePoint 2010

Step 1: Ensuring the required services are up and running-

    Ensure that Performance point Services feature has started on the system, to check this go to "Application Management" and click on "Manage services on server"
as shown in the image below


You can now see all the services present in SharePoint and also check if the services have started or not. Now scroll down and you can see the Services PerformancePoint Service and Secure Store Service and make sure its Started, if it is stopped Start the service by clicking on Start on the Action Column.


Step 2: Ensuring the services are configured properly-

a) Ensuring Performance Point Services is configured properly
    Now that the services are running, we will check if the services have been configured properly. Go to Central Administration and click on Manage Service Application as shown below


Once you do this you can see the list of services as shown below


go to Performance Point Service and click on it will take you to the manage screen, click on the PerformancePoint Service Application Settings


In the Settings screenm you can see if the user name has been configured or not. For now we will keep the default, except for the User Name (you need to add a user name if there is no user name in the Unattended Service Account).


b) Ensuring Secure Store Service is configured properly

    Secure Store Service is a service which helps in single sign on for its users, this service needs to work properly for you to go ahead and create any site. Sometimes the key might have generated properly or it might be missing hence we need to verify if this is done properly.
    Go back to the page where we saw all the services and click on "Secure Store Service" as shown in the image below


Once you have done this, check to see if there is a key generated for PerformancePoint Service application, if its not generated or if there is some problem go ahead and delete if there are any existing keys for PerformancePoint Service and click on Generate New Key as shown in the image below.


Step 3: Creating the Business Intelligence Site

    To create a new site, Click on Central Administration and click on Create Site Collections as shown in the image below


    It will now take you to a Create Site Collection Screen where in you can configure all the site properties like,

Web Application      - Defines the site under which the site collection should be created.
Site Name       - The name of the Site.
Web Site Address  - Configuring the URL through which you can access the new site.
Template Selection- There are various templates available in SharePoint as mentioned at the start of this post, since we are creating a Business Intelligence Site             click on Enterprise Tab and then click on Business Intelligence Center.
Primary Site Collection Administrator - User Name of the Admin has to be specified.
Secondary Site Collection Administrator - User Name of the secondary Admin has to be specified.
Qutoa Template - No Quota

The configuration will be as shown below

Once done, click on OK and the Site Collection will be created and once it is done you will get the screen shown in the image below.


Click on the link and the you will be taken to the screen where you will deploy, view reports.


Sunday, June 2, 2013

Sharepoint2010 Installation

          Now that you have downloaded the installable lets go ahead and install the platform on the system.


Step 1-
Before you start installation download the update given in the link →  


Step 2-
Once you install the updates click on the exe file to start the installation and you will see a splash screen of the SharePoint, 


when you click on Install Sharepoint Server you will see an error message as given below.


This error appears because SharePoint is by default set to be installed on the server and not on the normal OS. But there are 2 workaround for this by modifying the config.xml file.

a) When we started with the installation by clicking on the exe file it would have extracted all the files to a location on the machine. So if you go to Process Explorer while the splash screen is still present then go to the sharepoint process and check the Image properties in the Properties window then you can see the location where it has extracted the files.

b) if you dont want to do all this then just execute the following command in the command prompt
<path of the executable file> /extract:<path of the extracted files>
Once this is done then go to the config.xml in the setup folder and add the below tag into it
<Setting Id=”AllowWindowsClientInstall” Value=”True”/> . This setting will allow you to install the file on normal Windows OS as well. The config file now should look like the code given below.

<Configuration>
        <Package Id="sts">
                <Setting Id="LAUNCHEDFROMSETUPSTS" Value="Yes"/>
        </Package>
        <DATADIR Value="%CommonProgramFiles%\Microsoft Shared\Web 
ServerExtensions\14\Data" />
        <Package Id="spswfe">
                <Setting Id="SETUPCALLED" Value="1"/>
        </Package>

        <Logging Type="verbose" Path="%temp%" Template=
"SharePoint Server Setup(*).log"/>
        <!--<PIDKEY Value="Enter Product Key Here" />-->
        <Setting Id="SERVERROLE" Value="SINGLESERVER"/>
        <Setting Id="USINGUIINSTALLMODE" Value="1"/>
        <Setting Id="SETUPTYPE" Value="CLEAN_INSTALL"/>
        <Setting Id="SETUP_REBOOT" Value="Never"/>
        <Setting Id="AllowWindowsClientInstall" Value="True"/>
</Configuration>
 

Step 3
Now click on the executable file from the folder which has the extracted files and you will see the splash screen again. Now install all the prerequisites required for SharePoint.
    c) Windows Identity Foundation (Windows6.1-KB974405-x64.msu)

     
Step 4 –
Once these are done go ahead start of with the installation, It will ask you for a product key even though its a trial version.


 So use the key VK7BD-VBKWR-6FHD9-Q3HM9-6PKMX which is also given in the details section in the page where you downloaded SharePoint. 


Step 5-
Next it will ask you to choose between StandAlone and FarmMode, I will choose Farm Mode since some of the features like PowerView and Excel Services require the Sharepoint to be Farm Mode. The installation starts and will take sometime depending on the hardware configuration on your system.


Step 6-
Once you complete the installation you need to configure the SharePoint installation. The Farm Mode requires you to have Domain\Account, if you are using your personal system which does not have a domain controller the UI wont allow you to install in the farm mode, but there is a workaround for this as well,
Go to Sharepoint Management Shell located in the start menu (given below is the image for the same)


Right Click on the Sharepoint 2010 Management Shell and click on 'Run as Administrator' A command prompt opens up, here you need to execute a SP which helps you configure Farm Mode by using your system account itself rather than using a Domain Account.
SP Name :New-SPConfigurationDatabase
DatabaseName :<your Database Name>
DatabaseServer:<Database Server Name>
FarmCredentials: it will open up a pop up window where you need to enter your credentials. For Username please use <domain>\<username> (if you dont have name, your machine name itself is the Domain).
PassPhrase : Password for the sharepoint.


Once this is done run the configuration, there will be a screen where you can choose to create a new Server Farm or connect to an existing farm. Since we already have created farm we will choose connect to an existing farm.


Step 7 -
it will then ask you if you want to configure the port for Central Administration and also its security settings. We use the default setting which port 16915, NTLM as Security Setting and click on next.


Step 8 -
You will notice that it has already picked up the farm database and other details. Click next and it will configure the sharepoint 2010. Once done you will get a image which is shown below.


Step 9 -
Once this is done click on the SharePoint 2010 Central Administration in the start menu as shown below.


This should open up a web page as shown below.


You have now successfully installed and configured SharePoint 2010. Please let me know if you have any trouble while installing the same.

The next post will be about configuring services and accounts on the SharePoint portal.

Saturday, June 1, 2013

Sharepoint Introduction

What is SharePoint?
    SharePoint is a platform which traditionally was used for content and document management but now Microsoft is trying hard to change this perception. The SharePoint now has the capability to host Intranet portals, extranets, websites, discussion boards and Business intelligence; with the latest version of SharePoint 2013 they have also provided the social network integration.


    The first release of SharePoint was in 2001, the various versions of SharePoint released from 2001 till 2013 are given below -

1) Microsoft SharePoint Portal Server 2001
2) Microsoft SharePoint Team Services 2002
3) Windows SharePoint Services 2003
4) Windows SharePoint Services 2007
5) Microsoft SharePoint Services 2010
6) Microsoft SharePoint Services 2013

In this blog I will be taking you through various features of Sharepoint, but it will be concentrated more on the Business Intelligence part of it, I will be considering SharePoint 2010 and may be in future will write about SharePoint 2013 :) .

There are 2 versions of SharePoint 2010

1) Standard Edition
2) Enterprise Edition
The Enterprise Edition will have Access, Excel, Visio, Performance Point services which is not present in Standard Edition. In this blog I will be using Enterprise Edition for all demo purpose.

You can download the SharePoint software from the Microsoft WebSite, the link for which is given below.


http://www.microsoft.com/en-us/download/details.aspx?id=16631


Saturday, September 29, 2012

Forms Authentication in SSRS 2012


After spending 2 days scratching my head on how to implement forms authentication for SSRS 2012, I finally decided to use the forms authentication sample provided for SSRS 2008 R2 although the official Microsoft page says that it only works with SSRS 2008 R2 and earlier versions which was worth a try. Most of the steps are same as in SQL Server 2008 R2.
Given below are the steps taken for implementing the forms authentication sample in SQL Server 2012.

Building the sample -

Step 1 - Download the Security Extension Sample from and install the same on your system from the link given here Link
Step 2 - The sample will be installed in the same folder where you have installed your SQL Server. for example - <SQL Server Installation Folder> \100\Samples\Reporting Services\Extension Samples\FormsAuthentication Sample, you can see that there is one solution file for VB and one for C#. I will be using the solution file for C# in this post. Open the solution you might get a warning symbol next to Microsoft.ReportingServices.Interfaces, in that case open Right Click on the Reference node and say Add Reference which opens a dialog box, the click on browse and go to <ReportingService Directory>/ReportServer/bin and click on add.  Now you can see the warning symbol disappears.
Step 3 - In the AuthenticationExtension.cs and AuthenticationUtilities.cs files replace the localhost in connection string with the <servername>\RS_<instancename> (remember to prefix RS_ to the instance name).
Step 4 - Open the file AuthenticationUtilities.cs and replace the reportserverinstance with RS_<reportserver instance name>.
If you dont prefix RS_ for the instance name you might get invalid namespace error when you restart the reportserver.
Step 5 - In the AuthenticationUtilities.cs go the line where the wmiNameSpace has been declared and replace {0} with the RS_<report server instance name> and replace V10 with V11 so the string should like @"\root\Microsoft\SqlServer\ReportServer\RS_<instancename>\v11"
Step 6 - After making all these changes now you are ready to build the solution, but you would require a keyfile to complete this operation. So go to the VisualStudio command prompt and navigate to the Samples folder and execute the command "sn -k SampleKey.snk". If you navigate to the folder in the windows explorer you should be able to see the SampleKey.snk folder in it. Now right click on the project and click on build. You should be able to see the message  "Build Succeeded" and now you are ready to deploy the sample.


Deploying the sample -

Step 1 - Go to the Solution folder/bin/debug and you can find the files Microsoft.Samples.ReportingServices.CustomSecurity.dll, Microsoft.Samples.ReportingServices.CustomSecurity.pdb files. Copy these 2 files into <SQL Server Reporting Services Path>\ReportServer\bin directory and <SQL Server Reporting Services Path>\ReportManager\bin directory.
Step 2 - Copy Logon.aspx in the solution file into the and <SQL Server Reporting Services Path>\ReportServer directory.
Step 3 - Copy UILogon.aspx from  and <SQL Server Reporting Services Path>\ReportManager\Pages.


Modifying ReportServer and ReportManager configuration files -

Step 1 - Modifying ReportServer.config file located in <SQL Server Reporting Services Path>\ReportServer
a) Open the ReportServer.config file and add replace the <Authentication> tag with the code given below
<Authentication>
<AuthenticationTypes>
<Custom/>
</AuthenticationTypes>
<EnableAuthPersistence>true</EnableAuthPersistence>
<RSWindowsExtendedProtectionLevel>Off</RSWindowsExtendedProtectionLevel>
<RSWindowsExtendedProtectionScenario>Proxy</RSWindowsExtendedProtectionScenario>
</Authentication>
b) Replace the Security tag with the code given below
<Security>
<Extension Name="Forms"
Type="Microsoft.Samples.ReportingServices.CustomSecurity.Authorization,
Microsoft.Samples.ReportingServices.CustomSecurity" >
<Configuration>
<AdminConfiguration>
<UserName>username</UserName>
</AdminConfiguration>
</Configuration>
</Extension>
</Security>
<Authentication>
<Extension Name="Forms"
Type="Microsoft.Samples.ReportingServices.CustomSecurity.AuthenticationExtension,
Microsoft.Samples.ReportingServices.CustomSecurity" />
c) Locate the UI tag and replace it with the code given below -
<UI>
<CustomAuthenticationUI>
<loginUrl>/Pages/UILogon.aspx</loginUrl>
<UseSSL>True</UseSSL>
</CustomAuthenticationUI>
<ReportServerUrl>http://<server>/ReportServer</ReportServerUrl>
</UI>
* Remember to place your url in the ReportServerUrl tag and set UseSSL tag to false if you dont use SSL.

Step 2 - Modifying the RSSrvPolicy.config file located in the <SQL Reporting Services Path>\ReportServer
a) Add the below code to the existing policy which has the URL Membership of $CodeGen
<CodeGroup
class="UnionCodeGroup"
version="1"
Name="SecurityExtensionCodeGroup"
Description="Code group for the sample security extension"
PermissionSetName="FullTrust">
<IMembershipCondition
class="UrlMembershipCondition"
version="1"
Url="C:\Program Files\Microsoft SQL Server\MSRS10_50.MSSQLSERVER\Reporting Services\ReportServer\bin\Microsoft.Samples.ReportingServices.CustomSecurity.dll"
/>
</CodeGroup>

Step 3 - Modifying RSMgrPolicy.config file located in <SQL Reporting Services Path>\ReportManager folder.
You should locate the below code in the file and set PermissionSetName to "FullTrust" which has been shown in bold.
<CodeGroup
class="FirstMatchCodeGroup"
version="1"
PermissionSetName="FullTrust"
Description="This code group grants MyComputer code Execution permission. ">
<IMembershipCondition
class="ZoneMembershipCondition"
version="1"
Zone="MyComputer" />

Step 4 - Modifying the Web.config file located in the <SQL Reporting Services Path>\ReportServer folder
a) Locate the authentication mode tag and replace it with the code given below
<authentication mode="Forms">
<forms loginUrl="logon.aspx" name="sqlAuthCookie" timeout="60"
path="/"></forms>
</authentication>
b) Add the below code to below the Authentication Mode tag to restrict access to the users who dont have access rights
<authorization>
<deny users="?" />
</authorization>

Step 5 - Modifying the Web.Config file located in the <SQL Reporting Services Path>\ReportManager folder.
a) set <identity impersonate ="false" />
b) set <authentication mode="forms">
c) Go to appSettings and add the 2 keys given below to it
<add key="ReportServer" value="<Server Name>"/>
<add key="ReportServerInstance" value="<Instance Name>"/>

Creating Database - 
Go to <SQL Server Install directory>\100\Samples\Reporting Services\Extension Samples\FormsAuthentication Sample\cs\FormsAuthentication\Setup you can see 2 scripts, use the CreateUserStore.sql file and create database and tables which will be used for forms authentication.

Setting up admin access to the ReportManager
Step 1 -Open the ReportManager url and add a username and password and click register.
Step 2 - Open <SQL server reporting services install directory>\RSReportServer.config file
locate the Secuirty tag and you will see the tag Username tag in it and it has a dummy value as of now. Replace this with the username which you just registered.
<Security>
<Extension Name="Forms"
Type="Microsoft.Samples.ReportingServices.CustomSecurity.Authorization,
Microsoft.Samples.ReportingServices.CustomSecurity" >
<Configuration>
<AdminConfiguration>
<UserName>Bharath_RS</UserName>
</AdminConfiguration>
</Configuration>
</Extension>
</Security>
this will give that particular user complete access to the ReportServer as well as ReportManager.
So we have a the forms authentication up and running on your report server. If you get any error like unable to load Microsoft.Samples.ReportingServices.CustomSecurity.dll in the log files, restart your system and you should be able to see the login page for the reportserver or reportmanager.  Working on creating my own security extension instead of the one provided in the sample. Will post it if I am successful. If you have any problem while implementing this comment on this post, will try my best to resolve it.